
Diy Skimmer And Impeller Mod
I had a little time on my hands today and ticked another thing off the list :)
I decided to change the pump in my skimmer over to a DC pump because the skimmer is by far the loudest piece of equipment on my tank. Of course, this was to be done as cheaply as possible!
I could have just gone and got a new RLSS or Coralbox skimmer but my skimmer is a good design an has nothing wrong with it. It is a Bubble Magus BM220 CS2 and rated to 1200L - 1700L.
I decided that the best pump to use was a Jebao DC6000, as I have had a DC12000 as my return pump for the last year or so with no problems at all. The only problem is that the Jebao pump does not have a needle wheel option.
I looked in to the Waveline DC pumps but its about $200 more for the same output, but these come with a needle wheel impeller. Unfortunately the Waveline impeller has slightly different mounting holes so it won't fit the Jebao pump.
So the first thing to do was to design a needle wheel impeller that would fit the Jebao pump.
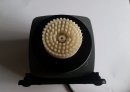
Here is the original impeller.

I designed an impeller that fitted within the dimensions of the original one so I wouldn't have to worry about it hitting the pump housing. I added a ring on the outer needles to add a bit of strength.
I also made up a little spacer so it would match the back of the original impeller.

I sent the .STL file over to @Rob and he was kind enough to print out the impeller for me :worship
Here is the original and new impellers next to each other.

The new impeller mounted on the pump. (I broke one of the needles off :p)

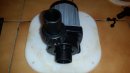
Next job was to get the new pump mounted in the skimmer. Here is what the skimmer looked like with the original pump.

The new pump is quite a bit smaller.

The diffuser was originally held down with a threaded nut but I only had a barbed fitting on the new pump, so I just used a couple of cable ties to hold it down. The ties fitted between the base of the diffuser and the barbs on the fitting so its nice and tight.


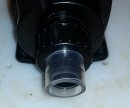
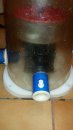
Next was to fit the venturi fitting. On the old pump, it was just a push fit directly on to the pump housing.
The new pump has a much larger opening, so I put a barbed fitting on to it to make it smaller. After that I put a small section over the barbed fitting and then the venturi fitted over the tube.
I will probably have a think about this part to make a more permanent fitting.

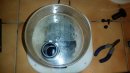
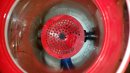
A view down the neck of the skimmer.

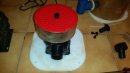
Finished and all back together.

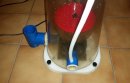
Skimmer running in the sump.

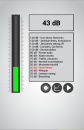
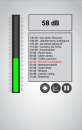
The difference in sound levels. I used a decibel meter on my phone. It probably isn't accurate but it gives a good indicator on how much difference there is. I can't hear the skimmer unless my cabinet is open now, super happy!

A little while ago I also added a failsafe to the skimmer in case it overflows. @Sam Parker made me a device with some float swtiches. It will turn off the skimmer if the sump water level gets high, the cup starts to over flow or the skimmate container gets full. No more skimmate getting dumped back in to my tank! :D
I decided to change the pump in my skimmer over to a DC pump because the skimmer is by far the loudest piece of equipment on my tank. Of course, this was to be done as cheaply as possible!
I could have just gone and got a new RLSS or Coralbox skimmer but my skimmer is a good design an has nothing wrong with it. It is a Bubble Magus BM220 CS2 and rated to 1200L - 1700L.
I decided that the best pump to use was a Jebao DC6000, as I have had a DC12000 as my return pump for the last year or so with no problems at all. The only problem is that the Jebao pump does not have a needle wheel option.
I looked in to the Waveline DC pumps but its about $200 more for the same output, but these come with a needle wheel impeller. Unfortunately the Waveline impeller has slightly different mounting holes so it won't fit the Jebao pump.
So the first thing to do was to design a needle wheel impeller that would fit the Jebao pump.
Here is the original impeller.
I designed an impeller that fitted within the dimensions of the original one so I wouldn't have to worry about it hitting the pump housing. I added a ring on the outer needles to add a bit of strength.
I also made up a little spacer so it would match the back of the original impeller.
I sent the .STL file over to @Rob and he was kind enough to print out the impeller for me :worship
Here is the original and new impellers next to each other.
The new impeller mounted on the pump. (I broke one of the needles off :p)
Next job was to get the new pump mounted in the skimmer. Here is what the skimmer looked like with the original pump.
The new pump is quite a bit smaller.
The diffuser was originally held down with a threaded nut but I only had a barbed fitting on the new pump, so I just used a couple of cable ties to hold it down. The ties fitted between the base of the diffuser and the barbs on the fitting so its nice and tight.
Next was to fit the venturi fitting. On the old pump, it was just a push fit directly on to the pump housing.
The new pump has a much larger opening, so I put a barbed fitting on to it to make it smaller. After that I put a small section over the barbed fitting and then the venturi fitted over the tube.
I will probably have a think about this part to make a more permanent fitting.
A view down the neck of the skimmer.
Finished and all back together.
Skimmer running in the sump.
The difference in sound levels. I used a decibel meter on my phone. It probably isn't accurate but it gives a good indicator on how much difference there is. I can't hear the skimmer unless my cabinet is open now, super happy!
A little while ago I also added a failsafe to the skimmer in case it overflows. @Sam Parker made me a device with some float swtiches. It will turn off the skimmer if the sump water level gets high, the cup starts to over flow or the skimmate container gets full. No more skimmate getting dumped back in to my tank! :D
Attachments
-
 560.5 KB Views: 21
 -
 556.2 KB Views: 18
 -
 38.8 KB Views: 20
 -
 71.7 KB Views: 18
 -
 66 KB Views: 17
 -
 91.1 KB Views: 18
 -
 74.1 KB Views: 19
 -
 38.6 KB Views: 19
 -
 91 KB Views: 22
 -
 63.3 KB Views: 18
Last edited:
 :D
:D